- I recently left my digital camera outside in a rain storm. It wasn't a sprinkle either. Anyway, I figured that the camera would be simply dead and maybe there was a chance I could recover the photos from the memory card. I dried the camera off, powered it up and thought all was perfectly fine...until tonight. I had a spare minute so I decided that I was time to move a batch of photos off the camera to the PC. I have been using Adobe's Photoshop Elements to batch rename the files to a directory. The file naming convention is always by date. Ever since the 'slip of the mind' which caused me to leave my camera hanging from a tree a few hundred yards from my door there had been an issue with the renaming process. After viewing the files on the memory card I realized that the first image was corrupt. Naturally, I deleted the first image and tried the renaming/import again. It did not work. What actually happened was that the number 2 image which after removing image number 1 became image number 1 - became corrupt.
The Solution
I decided that I probably wasn't going to have much luck trying to fix the camera itself or the memory card so I went another route - Google. I searched for 'batch renaming utility' - many choices came up and then I realized that there was a much 'safer place' to pickup a free utility - SourceForge. I found a program called "Rename-It!". I was a bit confused as to how to use the program but once I figured it out I realized how much time this method could possibly save.
The Process
Download "Rename-It!" - save the file somewhere on your desktop and install the program by double-clicking the file. Run the program after it has been installed. On the first screen you should see there is a button called "Add Files". Click this button and navigate to the directory where your images live. Select all of the images (ctrl + A) and hit the "Open" button. Next click the button called "Add Filter" - and choose "Search and replace". Next, put a check in the box which reads "Replace '%d'by a number serie". Next, click the small arrow to the right of the text box labeled as "Replace with:" and select "New file name". You should see the text box populate with this text "$(NewName)Image %3d". My standard file naming convention for image files is "YYYY.MM.A,B,C(etc..)1,2,3(etc..)". For example: 2007.09.A1.jpg. or 2007.09.B1.jpg. Using this format I replaced the text in the "Replace with" text area with this text "2007.09.A%d". In the preview area you can see the before and after affects of the renaming process. The final step is to click the button "Rename files". That's all there is too it. - The second problem I encountered during this process was timestamp related. The digital camera was saving images with the following date format 0000:00:00 00:00:00. I use Picasa to organize my photos and to upload them to an online photo album using my Gmail account. After renaming the files in the step above I realized that Picasa had put my new folder of images under the year 2000 (due to the timestamp issue) which totally screwed with my desire to be organized. In a nut shell, I needed to figure out how to modify the timestamp on image files.
The Solution
ExifTool
The Process
Download and unzip ExifTool (I recommend saving to your desktop). To read the image data you can drag and drop files onto the ExifTool file (named exiftool(-k).exe. The meta information will appear in a command line window. To edit the meta data you will need to change the file name from "exiftool(-k).exe" to "exiftool.exe". Next open up a command line in Windows (Start > Run > CMD) navigate to your desktop (or where you saved the ExifTool file). (To navigate using the command line in Windows: type 'cd ..' to move up a directory and type 'dir' to list the contents of a directory) - once you get to where the ExifTool executable file exists (exiftool.exe) - at the command line type 'exiftool.exe' and hit enter. Instructions will appear on the screen. Scroll the bottom or type 'q' + enter to skip the instructions. The command I used to modify the creation date use this format "exiftool "-CreateDate=2007:09:00 00:00:00" DIR" and for the original date and time you can use this format "exiftool "-DateTimeOriginal=2007:09:00 00:00:00" DIR" (you must remove the quotes from the command, and replace DIR with the path to the image files you are trying to modify). Here is an example of the commands I used: exiftool -DateTimeOriginal=2007:09:00 00:00:00 F:\Photos\2007_09_Digital and exiftool -CreateDate=2007:09:00 00:00:00 F:\Photos\2007_09_Digital.
That's all there is too it! Timestamps modified, Picasa placed the files (and directory) in the proper sequence (which satisfied my sometimes obsessive desire to organize).
Thursday, September 6, 2007
'Advanced' Image Editing Techniques
I had two problems to solve.
Monday, July 23, 2007
Forum Upgrade : Take A Look
For a few years now my web host has hosted my phpBB forum. The software has been out of date for quite some time. I emailed the host and they informed that they cannot upgrade the version of phpBB I was using. The problem with the previous version is that I was getting spammed daily. The messages were easy enough to remove but I really wanted to upgrade to see what the difference would be in the amount of spam I receive. Anyway, over this past weekend I decided that this was the time to upgrade phpBB.
After several hours, and many a help forum visit (the phpBB help forums) I finally got the latest version installed and working. The problem now is that the old version of phpBB is still accessible from the web. I have no access to the original version of phpBB so I installed the new version in my own directory and repointed all the links in my site. I am afraid that the spammers will keep using the older links (found all over the web) to post messages to my forum! I guess that I will just have to wait and see.
I attempted to use the built in captcha feature but it doesn't seem to work. I go to the admin panel and 'enable visual confirmation' but when I refresh the page after enabling the functionality the check defaults to 'no'. I think that this would be a helpful in combating the spam epidemic but as of this point I can't get the damn thing working. O'well, that is for another day.
Anyway, here is a link to the new forum:
Having problems with spyware, viruses (trojan, worms etc..) and or adware? Post a question in our forum, or browse the answers - take a look registration is free! Malware Solutions Forum
Saturday, June 30, 2007
Overnight Cruise Boat To Make Vermont's Lake Champlain Its Home in 2008
Lake Champlain Shoreline Cruises, operators of the Spirit of Ethan III in Burlington, Vermont, is thrilled to announce the arrival of their newest offering to Lake Champlain - The Moonlight Lady. The Moonlight Lady will debut in 2008 making her the first overnight cruise boat on Lake Champlain since 1952. She is a 65 foot custom built passenger yacht that was built in the classic 1920's style. “The Moonlight Lady will offer overnight excursions that will leave guests Relaxed, Refreshed, Recharged and Reconnected”, owner Mike Shea states.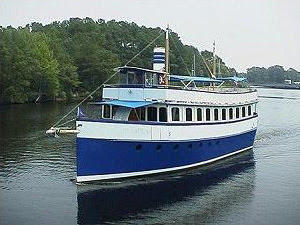 The journeys are being designed to have guests experience the rich history, natural beauty and abundant recreational opportunities available in and around the lake, as well as, having them savor the freshest Vermont foods prepared by the on-board chef. “It is like a floating Country Inn with ever changing scenery and adventure in and around every bay”, Shea adds.
The Moonlight Lady’s top deck, with its teak deck furniture can be used for special functions of up to 48 and makes a wonderful viewing deck for its 16 overnight passengers to capture the stunning views, as well as, the fresh lake and mountain breezes. The middle deck has the 8 guest cabins with private showers and a second viewing deck at the bow. The varnished black walnut lower deck lounge is comfortably appointed and includes a piano to inspire sing-a-longs.
One and three night cruises of Lake Champlain and the Richelieu River are being developed with special themes such as: Historical Explorations, Golf & Tennis Packages, Biking Adventures, Ecological Excursions and Fall Foliage Tours. Custom cruises can also be arranged.
For more information please visit our website: www.vermontmoonlightlady.com
Phone: (802) 863-3350
E-Mail: moonlightlady{at}soea.com
 The journeys are being designed to have guests experience the rich history, natural beauty and abundant recreational opportunities available in and around the lake, as well as, having them savor the freshest Vermont foods prepared by the on-board chef. “It is like a floating Country Inn with ever changing scenery and adventure in and around every bay”, Shea adds.
 The Moonlight Lady’s top deck, with its teak deck furniture can be used for special functions of up to 48 and makes a wonderful viewing deck for its 16 overnight passengers to capture the stunning views, as well as, the fresh lake and mountain breezes. The middle deck has the 8 guest cabins with private showers and a second viewing deck at the bow. The varnished black walnut lower deck lounge is comfortably appointed and includes a piano to inspire sing-a-longs.
One and three night cruises of Lake Champlain and the Richelieu River are being developed with special themes such as: Historical Explorations, Golf & Tennis Packages, Biking Adventures, Ecological Excursions and Fall Foliage Tours. Custom cruises can also be arranged.
For more information please visit our website: www.vermontmoonlightlady.com
Phone: (802) 863-3350
E-Mail: moonlightlady{at}soea.com
Thursday, June 28, 2007
Moonlight Lady Update ... The Story of The Moonlight Lady - coming soon....
I had a meeting with the team at The Moonlight Lady a few days ago. The plan is to turn the homepage into a log book. One where people can follow the journey of this unique boat from it's existing home www.bonnyblue.com to it's new home on Lake Champlain in Vermont. This log book will serve a few different purposes. 1) Well, to explain the story! 2) Because the story will be great content, and as well all know - 'content is king' on the web! 3) To attract attention! create a buzz! whatever you want to call it!
This website design project will be ongoing. The boat is now set to begin offering vacation cruises on Lake Champlain in 2008. Tour details, and more specifics are going to begin coming out weekly. Those of you who have been following the story please stay tuned to the site Overnight Vacation Yacht The Moonlight Lady and read the exciting story of The Moonlight Lady.
This website design project will be ongoing. The boat is now set to begin offering vacation cruises on Lake Champlain in 2008. Tour details, and more specifics are going to begin coming out weekly. Those of you who have been following the story please stay tuned to the site Overnight Vacation Yacht The Moonlight Lady and read the exciting story of The Moonlight Lady.
Chittendenchiro.com
Added a few more pages to Chittenden County Chiropractic over the past few days. So far I have:
index.html
How To Find Us
Meet The Staff
Newsletter Section
Orthotics
Contact Us
I am waiting for the remaining content. I found some small adjustments (corrections) that I need to make too. One that I just noticed when creating the links above was that I have the 'How To Find Us' page and the title is About Us. Sure, it's about the chiropractor but it's not really a typical about us page.
I still have to go through the pages and optimize for search engines, you know, adjust link titles and such, get in a few extra key words etc...
I also have to get a site map up there and submit Google sitemap to Google.
Sunday, June 24, 2007
New Website Design Client : Chittenden County Chiropractic
I received a call from the owner of Chittenden County Chiropractic last week. He had someone working on the website for him but I think that it might have been a student who was doing the work for free. He wants the site up a soon as possible. He has a good amount of content, enough to start with at least (but you really don't want to launch a site that isn't ready). Below is an image of what the site looks like at this very moment.
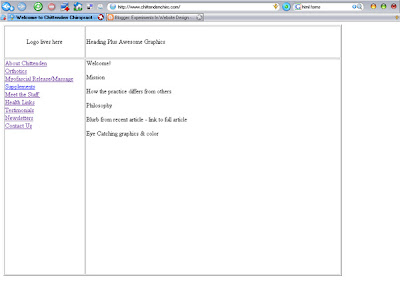
ChittendenChiro.com Before I Got To It
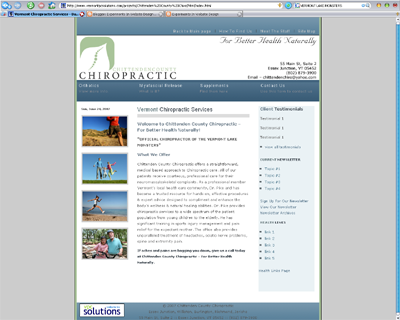
Since speed was a major factor as well as cost, I decided to go with a template. Here is the link to Chittenden County Chiropractic. I should have the homepage, a contact form, directions page, as well as a staff bio page up by tomorrow morning. I don't think he expects to see any results before a week has passed but I like to surprise.
Here is what the homepage looks like as of now:

ChittendenChiro.com Before I Got To It
Since speed was a major factor as well as cost, I decided to go with a template. Here is the link to Chittenden County Chiropractic. I should have the homepage, a contact form, directions page, as well as a staff bio page up by tomorrow morning. I don't think he expects to see any results before a week has passed but I like to surprise.
Here is what the homepage looks like as of now:

Tuesday, June 19, 2007
Holy Shit! Is This The Future of Web Design?
I was introduced to this page just a few hours ago - http://www.jackslocum.com/blog/index.php. My view of what is possible in web design has changed completely. I have begun thinking about how I could have implemented some of the ideas found on jacslocum.com, I mean really, I am not a 'programmer' - I am a 'cut & paste programmer'. I can piece stuff together and make it do what I need to get done but I really am not near the point where I would even begin writing some of the amazing code used in the examples found by clicking here. Damn though, now I want to rethink any page I have put together! Then again, it's the nature of design to transform itself over time.
Oh what am I going on about? Just click on one of those links and you should be able to find what you need. Good stuff going on there!
Oh what am I going on about? Just click on one of those links and you should be able to find what you need. Good stuff going on there!
Saturday, June 16, 2007
Div Layers : Overlays : Transparent Backgrounds and PNG Files
On Moonlight Lady's - 3 night boat cruise page I have a map of Lake Champlain which displays the route taken by the Moonlight Lady on her 3 day 4 night vacation packages. The problem I was facing was this. The map if somewhat large (576 KB - .png file) in side and the idea is that when you visit the page you first see the entire map. I have these tabs setup so that a visitor can click on Day 1 of the tour which would trigger a JavaScript event which would show/hide a div containing a map (301 KB) showing the route the boat will take on day 1 only. The problem is that I have a total of 5 maps to use. Which means that if they are hidden by default the browser is still going to have to load all of those images.
I mentioned this briefly to a co-worker (thanks Tim) and he suggested 'div overlays'. Then I thought about it: default div shows the full version of the map without any of the specific day to day info (576 KB). The map will be set as the div's background-image. Next I will create an image the exact size of the default map. This image will have a transparent background and will only show the highlights of that particular part of the vacation. This image (63 KB - as opposed to 301 KB which is the image without a transparent background) will be set in a div, which will have it's background-color set to transparent. What will happen is that when a user clicks on day 1 is that the div for day 1 will be exposed which will 'overlay' this transparent background image over the default map creating the illusion that this is a new map when indeed it's a much smaller map (63 KB). Then as the different tabs are clicked exposing each new map the other maps will become hidden.
For effect I put the 'slider' action on the div overlay as the new div is exposed. What this does is that when a tab is clicked, say day 1, the overlay 'slides' down from the top of the map until it is in position.
Oh, and if you are going to use .png files with transparent backgrounds don't forget that IE6 doesn't like .png files with transparent backgrounds. You will need to implement the IE6 PNG Fix. I posted about this in a previous blog entry. You should be able to dig it up or just do a Google search.
Wednesday, June 13, 2007
Added YUI Library Controls to VermontMoonlightlady.com
I decided to use few of Yahoo!'s YUI Library Controls. I have setup the popup calendar to be used as a reference when selecting tour dates on the the boat tour description page (6/13/07) (and I just noticed that I need to adjust the vertical position of the calendar - this will probably be fixed before you read this) - this link will bring you to what is going to be the final page for the 3 day 4 night tour description. Currently (6/13/07) - the homepage is setup with the working version of the contact form (set up in an iFrame - which is another problem all together - what is up with IE6 and the inability to hide borders on an iFrame? - I have not found a 'work around' (aka hack) for Internet Explorer's inability to render code as Firefox, Opera). I have also implemented the use of a slider control when toggling divs (not that this is part of the Yahoo Library but anyway). Lastly I am using Yahoo!'s TabView.
So far the only feedback I have received from the owner is "wow"! I guess that this is a good thing!
So far the only feedback I have received from the owner is "wow"! I guess that this is a good thing!
Update : Moonlight Lady : Vermont Vacation Cruise
I was informed this morning that due to complications the Moonlight Lady will not be available for Lake Champlain vacation cruises this year (2007). The website will still be build and worked on at a normal pace (as opposed to the blistering pace I had planned on).
Cruises will begin in the summer of 2008. I will keep you posted on the progress of the site as things move along. The plan is to document any problems that arise during the website building process.
Cruises will begin in the summer of 2008. I will keep you posted on the progress of the site as things move along. The plan is to document any problems that arise during the website building process.
Thursday, June 7, 2007
Burlington Vermont's First Overnight Boat Cruise on Lake Champlain
Press Release: Burlington, Vermont June 6, 2007
Overnight Cruise Boat To Make Vermont's Lake Champlain Its Home
Green Mountain Boat Lines, operators of the Spirit of Ethan Allen III in Burlington, Vermont, announced the arrival of the Moonlight Lady, the first overnight cruise boat on Lake Champlain. The Moonlight Lady is a 65 foot custom built passenger yacht that will offer exciting 1 and 3 night Vermont vacation excursions. "The journeys are designed to have guests experience the ever changing natural beauty and abundant recreational opportunities available in and around the lake", states owner Mike Shea. The Lady's top deck, with it's teak deck furniture will accommodate up to 30 for special functions. The main deck houses eight staterooms, with private shower rooms, and a forward lounge. The varnished mahogany lower deck lounge features a wet bar and a piano to enhance the mood and inspire sing-a-longs. Vermont's local seasonal products will be the focal point for the on-board chef's creative menus.
"The Moonlight Lady will offer many options to chart their own boat cruise adventure. Whether it is sitting on deck taking in the sights and sounds with a beverage and a good book or taking advantage of the many port-of-call options, such as; golf, tennis, kayaking, biking and spa elements. The journey on the Moonlight Lady will have you Relaxed, Refreshed, Recharged and Reconnected", Shea explains.
Launch of Moonlight Lady to be part of the Lake Champlain Maritime Festival
A press conference will take place on June 12 at 1:30 aboard The Spirit of Ethan Allen III to formally announce the the Moonlight Lady. Her official launch will take place as part of the festivities of the 2nd annual Lake Champlain Maritime Festival on the Burlington, Vermont Waterfront August 17 - 19. For more information on the festival:
Lake Champlain Maritime Festival
For more information about Burlington, Vermont vacation boat cruises go to VermontMoonLightLady.com
Sunday, June 3, 2007
CSS: XHTML : Rounded Container
Let's face it. The rounded-edge look of the web is quite popular these days and for good reason. In my opinion, it's a softer, more modern, more friendly design element. Sure you could easily set up a webpage using <table> table tags </table> (please don't misunderstand, table tags have their place, I am taking about the layout of the page/site itself) but the correct way would be to use tabless design techniques using CSS and <div>divs</div>.
Anyway, this is how I have learned to create the rounded-border effect you can commonly see in some of the more recently designed sites. For some of you this might be basic stuff but I know that when I was trying to figure out the whole css/div thing I found many resources explaining the whole 'box model' thing and great articles on tableless design but I wish that one could give the basic, bare-bones version, no fluff. So here it is.


The idea is that you have a top image, a center content area and a bottom image.
Here is the top image:
Here is the bottom image:
To create these image open Photoshop and create an image using the total desired width of your webpage as the width of this new image. Use a transparent background. For example: for this example I created an image 400px wide and 30px high. I used the color #003399.
Then using the rounded rectangle tool create a rectangle spanning the entire width and height of the canvas.
Next using the Rectangular Marquee Tool select one half (horizontally) of the rounded rectangle and using the cut it from the image. Next click File - then New and paste the half of the rounded rectangle into this new canvas. Save the file in your images directory as top.png. Then cut the bottom image out, open a new file, paste the image in and save for web as bottom.png.
Here is the basic layout for the divs:
Anyway, this is how I have learned to create the rounded-border effect you can commonly see in some of the more recently designed sites. For some of you this might be basic stuff but I know that when I was trying to figure out the whole css/div thing I found many resources explaining the whole 'box model' thing and great articles on tableless design but I wish that one could give the basic, bare-bones version, no fluff. So here it is.
This is the content area. This would be filled with some sort of content.
The top section is just a div with an image called top.png. After that you have two divs. The outer div with the blue background and then a div inside that div where the content goes. These divs are followed by bottom.png also contained in it's own div.
This space will keep growing vertically as the you fill this area with text, images etc...
The idea is that you have a top image, a center content area and a bottom image.
Here is the top image:
Here is the bottom image:
To create these image open Photoshop and create an image using the total desired width of your webpage as the width of this new image. Use a transparent background. For example: for this example I created an image 400px wide and 30px high. I used the color #003399.
Then using the rounded rectangle tool create a rectangle spanning the entire width and height of the canvas.
Next using the Rectangular Marquee Tool select one half (horizontally) of the rounded rectangle and using the cut it from the image. Next click File - then New and paste the half of the rounded rectangle into this new canvas. Save the file in your images directory as top.png. Then cut the bottom image out, open a new file, paste the image in and save for web as bottom.png.
Here is the basic layout for the divs:
<div style="width: 400px; height: 15px; margin: 0; padding: 0; border: 0;"><img style="margin: 0; padding: 0; border: 0;" src="images/top.png" border="0" alt="top image" /></div>
<div style="width: 400px; margin: 0; background-color: #003399; padding: 0; border: 0; text-align: center;"><div style="width: 380px; margin: 0 10px 0 10px; background-color: #ffffff; float: left; border 1px solid #c0c0c0; text-align: center;"><p>This is the content area. This would be filled with some sort of content.</p>
<p>The top section is just a div with an image called top.png. Then you have the content area followed by bottom.png also contained in it's own div.</p>
<p>
This space will keep growing vertically as the you fill this area with text, images etc...</p></div></div>
<div style="clear: both; height: 0; margin: 0; padding: 0;"></div>
<div style="width: 400px; margin: 0; padding: 0; height: 15px; border: 0;"><img style="margin: 0; padding: 0; border: 0;" src="images/bottom.png" border="0" alt="bottom image" /></div>
Saturday, June 2, 2007
My MySpace Fun
Okay, so one might say that I have too many 'projects' going on but here is another I have to throw in. Take a look for yourself. You might have a laugh or three.
Abandoned Sound
description: a fictitious music band complete with album covers as well as full length cd's containing original music by the band (me). laugh as you submerge yourself in this world of electronic sounds and Photoshop edits.
Abandoned Sound
description: a fictitious music band complete with album covers as well as full length cd's containing original music by the band (me). laugh as you submerge yourself in this world of electronic sounds and Photoshop edits.
HTML : CSS : JavaScript - How To Show & Hide (Toggle) Divs
Just a note: I did not invent this technique and I am sure that others can improve upon this code so please feel free to comment.
This is something I learned a while back but I figured that I would write a little something down with the intention of possibly helping someone understand how to show/hide (toggle) divs using HTML, CSS (Cascading Style Sheets) and a bit of JavaScript.
Here is a bare-bones example. Say you had a horizontal navigation set up. The desired effect is that you want something to 'appear' on this same page when a user clicks on 'link 1' for example: Go ahead, click on link 1
So how does this work? It takes some CSS and a bit of JavaScript:
** This goes between the <head> and </head>, or you can set this up in an external .js file (but then you would need to remove the comment tags and the opening and closing script tags - and don't forget to reference the external file between the <head> head </head> tags
Something like this <script type="text/javascript" src="the_file_name.js" ></script>.
here is the Javascript:
<script language="JavaScript" >
<!-- <!-- To use in external stylesheet remove this line up -->
function toggleDiv(whichLayer)
{
if (document.getElementById(whichLayer).style.display == "none") {
document.getElementById(whichLayer).style.display = "";
}
else {
document.getElementById(whichLayer).style.display = "none";
}
}
//--> <!-- To use in external stylesheet remove this line down -->
</script>
and here is the code to trigger the 'toggling' of the div
<a href="javascript:toggleDiv('hideMe')">link 1</a>
and here is the code to set up the hidden div
<div id="hideMe" style="display:none; width: 300px; background-color: #000000; border: 1px solid #ffffff; text-align: center; padding: 10px; color: #ffffff;">Once I was hidden and now I am not. Click on 'link 1' again and I will be hidden </div>
One of the important things to remember is to set the id of the hidden div, for example this one is called 'hideMe' then you must trigger the JavaScript and make sure you trigger the correct id - yes, you guessed it - 'hideMe'
That's pretty much all there is too it. If you want a bunch of different hidden divs then use a bunch of different ids. You cannot use duplicate ids, each one on a page must be unique. Click on 'link 2' and 'link 3' to see a two more examples of what can be done.
Here is the coding for all three links and the div connected to them, including 'hideMe2' and 'hideMe3'so if you have not clicked on them I recommend doing so now: you might need to scroll all the way to the top of the page to see these divs - they are positioned absolutely using CSS.
<div style="width: 300px; background-color: #c0c0c0; border: 1px solid #000000; text-align: center; padding: 10px;">[<a href="javascript:toggleDiv('hideMe')">link 1</a>] [<a href="javascript:toggleDiv('hideMe2')">link 2</a>] [<a href="javascript:toggleDiv('hideMe3')">link 3</a>]</div>
<div id="hideMe" style="display:none; width: 300px; background-color: #000000; border: 1px solid #ffffff; text-align: center; padding: 10px; color: #ffffff;">Once I was hidden and now I am not. Click on 'link 1' again and I will be hidden</div>
<div id="hideMe2" style="display:none; width: 300px; position: absolute; top: 300px; left: 300px; background-color: #000000; border: 1px solid #ffffff; text-align: center; padding: 10px; color: #ffffff;">Me, I was hidden but I am using CSS absolute positioning. Maybe I will attempt to talk about that in the near future.</div>
<div id="hideMe3" style="display:none; width: 300px; position: absolute; top: 400px; left: 150px; background-color: #000000; border: 1px solid #ffffff; text-align: center; padding: 10px; color: #ffffff;">Link 3 triggered me. I set this div's id as <span style="color: red;">hideMe3</span></div>
The JavaScript does not change.
note: Normally I would not use an external stylesheet for the CSS and therefore I would be able to reduce some of the repetitive code. Hopefully you get the point of this quick tutorial.
Google Link Experiment
I put a link to this blog on the homepage of Vermont PC Solutions. The experiment is to see how long it takes Google, Yahoo and MSN to index this blog. The link was added and file uploaded at 6:33 AM June 02, 2007.
Test it yourself:
MSN, Google and Yahoo
{edit} I just thought of something - How would I know if Google found this blog from my own site?
update - June 04, 2007: using the first post from this blog I searched for the string "The Moonlight Lady will reside on Lake Champlain in Burlington, Vermont. The boat has been purchased but not yet delivered." on MSN, Google and Yahoo - no signs of it being indexed yet.
update - June 05, 2007:Content is still not showing on Google, MSN or Yahoo. Checked my Google Sitemap and I saw that the last visit to the homepage of Vermont PC Solutions was May 16th. I resubmitted the sitemap (5:00 AM today) in hopes that GoogleBot will crawl my site and pick up the blog url.
I also added a post in my forum in hopes of getting indexed.
update - June 13, 2007: Checked Google, this page has been indexed. I did not check it yesterday but it wasn't there on Sunday so it looks like it took about 10-11 days to show up on Google. MSN and Yahoo still show zero search results.
update - June 16, 2007: Checked MSN - they have this page listed. It still isn't showing on Yahoo.
Country Club Condos : Website Project On Hold
I have decided to put this project on hold for a while. This is a personal project and I will start up again once I have completed the projects I have in the works for my existing clients.
Screenshot : Malware Solutions Redesign Project
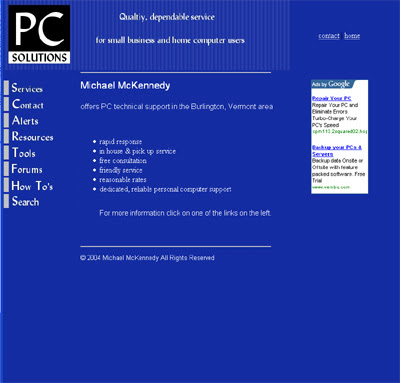
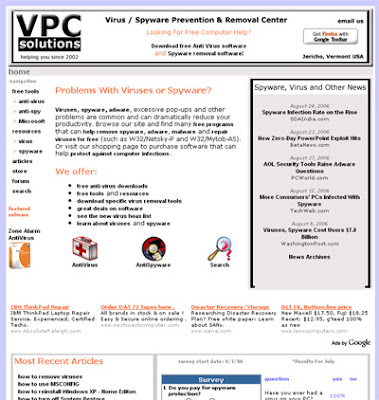
Here is the original site. This is back in 'the day' when I was doing in-house computer repair. (I could tell stories about that but that is for another time.) This was from 2004.
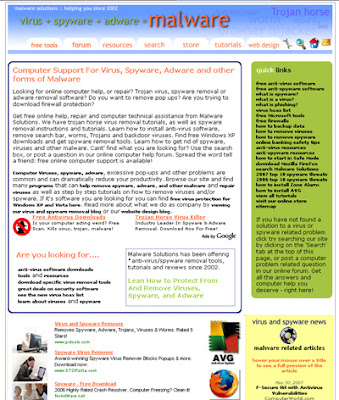
This was from sometime in 2006.
Here is what the current design (as of June 2007)looks like.
This is the look of the new Malware Solutions site thus far.
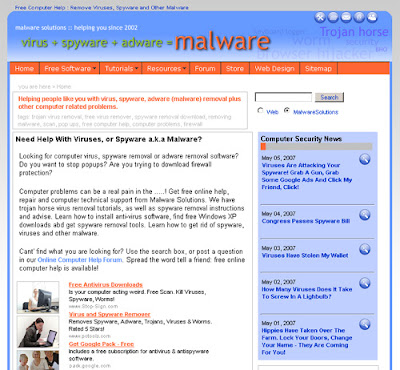
This page uses lots of hidden divs. The idea is to reduce clutter on the page and to give the user the opportunity to show and hide only the information that choose to see without actually leaving the page. I have had some concerns over hidden divs and the ability of search engine crawlers to pick up the hidden div text. I have read that hiding text might actually hurt your rankings. I have also read that search engines won't even index the content from hidden divs (although I can't find the article at the moment). I have tested this theory and I have found this to be false.
Here is how I know.
Go to this page, then click on "The Process". If you copy the first paragraph, paste the text into a Google search box, put quotes around the text and hit search you will see that this hidden div's text is indeed showing on Google.
The 'slide in and out' functionality of this page comes from http://script.aculo.us/
The navigation comes from Project Seven's CSS Express Drop-Down Menu
This is a work in progress. I am still trying to dig up a screen shot of what the site looked like in 2005. I know that I had a black theme going on. Background was black, header was black etc... O'well, things change.

This was from sometime in 2006.

Here is what the current design (as of June 2007)looks like.

This is the look of the new Malware Solutions site thus far.

This page uses lots of hidden divs. The idea is to reduce clutter on the page and to give the user the opportunity to show and hide only the information that choose to see without actually leaving the page. I have had some concerns over hidden divs and the ability of search engine crawlers to pick up the hidden div text. I have read that hiding text might actually hurt your rankings. I have also read that search engines won't even index the content from hidden divs (although I can't find the article at the moment). I have tested this theory and I have found this to be false.
Here is how I know.
Go to this page, then click on "The Process". If you copy the first paragraph, paste the text into a Google search box, put quotes around the text and hit search you will see that this hidden div's text is indeed showing on Google.
The 'slide in and out' functionality of this page comes from http://script.aculo.us/
The navigation comes from Project Seven's CSS Express Drop-Down Menu
This is a work in progress. I am still trying to dig up a screen shot of what the site looked like in 2005. I know that I had a black theme going on. Background was black, header was black etc... O'well, things change.
Friday, June 1, 2007
Internet Explorer 6 : PNG Fix
While learning about CSS and tableless design using 'Divs' - I stumbled upon a problem. It took me quite a while to find the solution because I really didn't know what issue I was trying to resolve (I know, in order to resolve a problem you must first know what the problem is - yes, this is basic, I know.) I decided to use .png files.
Not sure what a .png is? Read on...
"For the Web, PNG really has three main advantages over GIF: alpha channels (variable transparency), gamma correction (cross-platform control of image brightness), and two-dimensional interlacing (a method of progressive display). PNG also compresses better than GIF in almost every case, but the difference is generally only around 5% to 25%, not a large enough factor to encourage folks to switch on that basis alone. One GIF feature that PNG does not try to reproduce is multiple-image support, especially animations; PNG was and is intended to be a single-image format only." source: www.libpng.org.
Anyway, I was testing my new images using IE7, Firefox and Opera - everything looked great. Then I remembered the dreaded IE6! I booted up a computer still running the piece of junk browser and noticed that my .png files (which should have had a transparent background) looked like crap (this is not a technical term) but I had no idea as to why they looked like crap! I struggled. I searched (but I didn't know what I was searching for and I almost decided to go back to .jpg's and .gif's but eventually I found this page - The PNG problem in Windows Internet Explorer. Not only did I find the solution (a bit of JavaScript code to make things better) but a description of the problem, with examples. Needless to say that after a week or so of frustration I was nearly airborne when I realized just how easy it was to make up for one of the many shortcomings of Internet Explorer 6!
Redesign In Progress
This is an ongoing project I am working on. I am redesigning Malware Solutions using tableless design. When completed the site will use valid XHTML and CSS. If you are interested you can see the progress here by clicking on "client login" (you do not need a password or username).
The purpose of the redesign is to optimize the site (SEO) and to see how far I can climb in search engine rankings using only SEO.
I don't have a time line for completion. This project will take a back seat as new clients are added to my work load.
The purpose of the redesign is to optimize the site (SEO) and to see how far I can climb in search engine rankings using only SEO.
I don't have a time line for completion. This project will take a back seat as new clients are added to my work load.
Latest Project - Burlington, Vermont - Vacation Boat Rental - The Moonlight Lady
The Moonlight Lady will reside on Lake Champlain in Burlington, Vermont. The boat has been purchased but not yet delivered. This website design project began May 24, 2007. The site will use XHTML, CSS, JavaScript, a few Yahoo modules and who knows what else. I have full creative control over the design layout.
The project files can be seen here
This file will be updated to reflect the most current version. Previous versions can be seen by replacing index.html with index01.html, index02.html etc...
The project files can be seen here
This file will be updated to reflect the most current version. Previous versions can be seen by replacing index.html with index01.html, index02.html etc...
Subscribe to:
Comments (Atom)
